In Parts 1 and 2, I discussed the preparation of the patient, the incision and atraumatic flap elevation. These are the first three steps necessary to perform predictable apical microsurgery. As was mentioned earlier, it is of utmost importance that all steps are done completely before proceeding to the next step.
If a step is omitted, or not done completely, the next step will be difficult, if not impossible, to do properly. The operation will develop into a stressful experience for the patient, the staff and the clinician with an end result not as desirable or predictable.
If all of the steps are completed as outlined, all procedures can be performed without stress, and a favorable post-operative result can be expected. I have completed hundreds of apical microsurgical operations and all results were the same with just a few exceptions. The technique is very gentle and predictable, if all of the steps are followed without compromise.
After the properly designed flap has been atraumatically reflected and retracted, the access preparation is ready to begin. Some important considerations are:
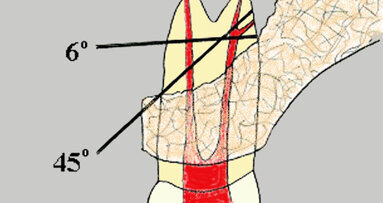
- How much bone exists on the buccal aspect of the root undergoing surgery? If there is total dehiscence, guided tissue regeneration has to be considered. Ideally, there should be at least 3–4 mm of healthy, intact crestal buccal bone remaining after the access preparation is completed (Fig. 1).
- How much of the apex can be beveled or resected? Usually, there is an adequate amount of root length to work with. The shorter the root, the more conservative the operator will have to be when beveling, and the closer the bevel should be to 0 degrees so less removal of the root end is possible.
If an exceptionally long post is present, that is closer to the apical terminus than desired, not as much of the root end can be resected. Or, if the periodontal bone level is less than desired, a more conservative amount of apical root structure should be removed to preserve as much crown/root ratio as possible.
Fortunately, the operating microscope (OM), and/or the Endoscope (JedMed), allows the operator the luxury of being ultra-conservative when necessary.
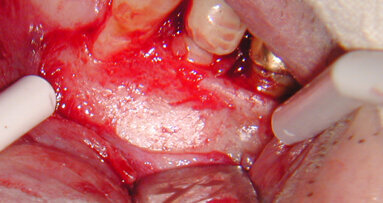
The access to the root end is done most effectively with a high-speed handpiece that has no air exiting the working end (Fig. 2a). The usual air-driven handpiece does have air at the working end and using it could result in an air embolism. It is important to use as much water coolant as vision will permit to maintain the moisture in the tissues. Using a fine stream of water from the Stropko Irrigator fitted with a 27-gauge needle, the scope assistant can keep the area moist and evacuate excess fluids at the same time. The initial access and apiection can be accomplished with just three surgical length burs: the Lindemann bone bur, a #6 round bur and an 1171 fissure bur (Fig. 2b). There are basically two different ways to begin the access:
1. Estimate the amount of the apex to be resected and, with a Lindemann bone-cutting bur, remove the apex and prepare the access opening in one general step. If there is any portion of the apex remaining in the crypt, it is curretted out and the access is more or less complete.
2. A more accurate procedure is to estimate the location of the apex. Then, using a #6 surgical length, round bur, slowly and gently remove the bone overlying the buccal surface of the root. When the buccal surface of the apex is uncovered, bone is removed until the coronal limit of the crypt is established and the general outline of the apex is readily observed and can be apiected at this time. Often, especially with larger periapical involvement, the lesion can be curetted and the entire apex exposed. If the lesion is more palatal or lingual, the root apex may prevent the necessary access for curettage and will have to be partially beveled or resected as part of the access process.
A thorough curettage is important because it is the first stage of achieving hemostasis from within the crypt. In general, if all of the granulation tissue is removed, the amount of hemorrhage will be greatly reduced, the management of the crypt is easier to accomplish and good visibility can be restored. This technique takes more time but results in better visibility and the ability to be more precise with the initial apiection. The finished bevel will be discussed in detail later in the article.
In general, a biopsy should be performed on all tissue removed from the body. We are usually quite confident of the pathological diagnosis of the LEO, but my feeling is even if the odds are 1 in 100,000 that we are incorrect, no chances should be taken and a biopsy should be taken on a routine basis.
The final dimension of the access opening varies and is dependent on several factors:
- The size and position of the lesion. If the lesion is larger, the access will of necessity be larger in order to perform a complete curettage.
- The position of the apex determines the size of the access. The more lingual the apex, the more overlying bone has to be removed and the larger the access has to be for good visibility.
- The access has to be large enough to allow the instruments room to prepare the apical canal system without inhibiting their freedom of movement. The larger the instruments used, the larger the access must be.
- The thickness of overlying bone is also important. If the buccal plate is thick, a wider access is necessary to eliminate a “tunnel effect” so vision is not compromised.
- The experience and ability of the surgeon, and equipment available, is a great determinant on how large the access will need to be. I use both an Endoscope and the OM when performing apical microsurgery. On some occasions, the Endoscope permits a better view of the surgical site due to increased lighting and magnification. It also increases the ability to view previously difficult, and sometimes impossible, areas to see with the OM. The extent of a defect or existing anatomical variations that are lingual to the involved root end are typical examples of the value of also having an Endoscope during microsurgical procedures.
The management of the crypt is one of the most important steps, and the operator should take as much time as necessary to achieve the desired result. The clean and well-managed crypt is essential for good visibility and proper use of the retrofill materials. Ferric subsulfate (Monsels Solution, Cutrol), calcium sulfate (Capset, SurgiPlaster), Telfa pads and epinephrine-soaked pellets (Epidry from Pascal) are the most commonly used and effective agents for this purpose.
After all granulation tissue and other debris have been thoroughly removed from the crypt, hemostasis is often achieved as a result of proper “hemostasis staging injections” discussed previously. If that is the case, only an appropriately sized piece of Telfa pad lining the floor of the crypt is necessary to enhance lighting. However, this is not always the case and even slight bleeding must be addressed.
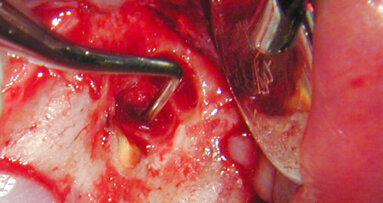
If the crypt exhibits slight hemorrhaging, the tissue surface or piece of Telfa trimmed to the correct size to fit can be lightly streaked with Monsels Solution and pressed into the floor of the crypt for a short period of time until the hemorrhaging is controlled (Fig. 3).
If there is moderate hemorrhaging, the Monsels Solution is carefully applied with a micro applicator (Ultradent) directly to the problem area in the floor of the crypt. Keep in mind that only a small amount is necessary (Fig. 4).
When ferric sulfate is used to achieve hemostasis, a thick brownish-black coagulum will usually result (Fig. 5). The resultant coagulum can be easily removed from the crypt with a clean Micro-applicator (Ultradent), gently flushed with water using a larger tip on a Stropko Irrigator as the assistant is evacuating any debris during irrigation of the crypt. The process is repeated until the bleeding is controlled. As soon as there is complete control of all bleeding in the crypt, the Telfa should be removed and replaced with a fresh piece so there is as much “white” surface as possible to facilitate light reflection and enhance vision.
As long as the coagulum resulting from the use of Monsels Solution has been cleaned out of the crypt after the completion of the surgery, its use has not been shown to affect the healing process.1
Caution: All forms of ferric sulfate must be kept well within the confines of the crypt. It has an extremely low pH and will instantly chemically cauterize anything it touches. The buccal plate of bone, the periosteum, soft tissue and the Scheniderian membrane should always be avoided! It is important to keep in mind that “If a little bit is good, a lot is not better!” Use only small amounts on the end of an applicator because a small amount goes a long way. (Fig. 4)
Note: There are two popular forms of ferric sulfate: Monsels Solution has a concentration of 72 percent and Cutrol is 53 percent. I like the Monsels Solution because it is very effective, readily available and less costly to use.
On a few occasions, severe hemorrhaging occurs. This can be a result of inflammation, a severed interdental artery or a compromised clotting mechanism.
At any rate, when the blood flows faster than the evacuator can remove it, there is good reason for a little excitement and fast action! The first thing to do is to apply pressure over the crypt with a finger. This will stop the hemorrhaging long enough to calmly prepare the next few steps. In a low and controlled voice, instruct the assistant to insert a bigger tip into the evacuator and hold it close to the crypt. If after removing your finger, the hemorrhaging has not subsided, quickly replace your finger over the crypt as before.
It is a good idea at this time to take a radiograph and clinically re-evaluate the surgical area to make sure no unforeseen anatomical structures (mandibular canal, palatine artery, etc.) have been infringed upon.
Now have your assistant take a piece of sterile cotton roll and make a “cotton plug” large enough to completely fill the crypt, lightly streaking the tissue surface with Monsels Solution and insert into the crypt, holding it firmly in place with your finger for a minute of so.
After a few minutes, the cotton “plug” can be safely removed and you can proceed without undue concern. A gentle irrigation with the Stropko Irrigator will remove most of the dark-colored coagulum. The above technique has worked all three times I found myself in that situation. In two of my cases, an interdental artery was the cause and the other was highly inflamed granulation tissue remaining in the crypt.
If hemorrhaging occurs on the surface of the exposed buccal plate, a Touch and Heat (SybronEndo) can be used. The scope assistant can evacuate the “bleeder” with a small surgical tip, so its exact source can be determined, and the Touch and Heat can be used to effectively cauterize it. After the hemorrhaging is completely controlled and the crypt relatively cleansed of the coagulum, a fresh piece of Telfa should be placed over the internal surface of the crypt (Fig. 6). Keep in mind when using the OM that light and dryness are the most important factors for good visibility. Note: Never proceed to the next step until total crypt management has been accomplished.
Once the crypt management is completed, the clinician can proceed to refinement of the bevel and preparing the retropreps with confidence and good visibility. At the end of this step, all hemorrhaging should be controlled; the grossly resected apical end of the root should be easily seen; and the floor of the crypt should be covered with a clean, white piece of Telfa. An apical microsurgeon’s dream!
References available upon request from s.rendon@dental-tribune.com.
embedImagecenter("Imagecenter143",143);
About the author
Dr John J. Stropko received his DDS from Indiana University in 1964, and he practiced restorative dentistry for 24 years. In 1989, he received a certificate for endodontics from Boston University and recently retired from the private practice of endodontics in Scottsdale, Ariz. Stropko is an internationally recognized authority on micro-endodontics. He is the inventor of the Stropko Irrigator, has published in several journals and textbooks and is an internationally known speaker. He is the co-founder of Clinical Endodontic Seminars and currently on the endodontic faculty at the Scottsdale Center for Dentistry in Scottsdale, Ariz., as an instructor of microsurgery. Stropko and his wife, Barbara, currently reside in Carefree, Ariz. You may contact him at topendo@aol.com.
The amount, or degree, of the root-end bevel (REB) is of utmost importance and should be precisely planned in advance after considering the overall ...
All steps have been meticulously followed, the REF has been placed, the crypt has refilled nicely, the final radiograph has been approved, and it is time to...
In Parts 1 through 4, the necessary steps and procedures were presented, enabling the operator to atraumatically and predictably allow the root-end ...
Surgery will never replace solid endodontic principles and should always be a last resort. Apical microsurgery consists of nine basic steps that must be ...
Using a disposable CK2 microsurgical blade (SybronEndo), the incision is made. With the smaller size of this blade, very accurate incisions can be made that...
As many dental offices know, no matter what you spend for IT support for your computers, it’s usually nothing compared to what it costs if your ...
NEW ORLEANS, La., USA: In what will certainly be considered a highlight of AAE17, two live endodontic microsurgeries — one mandibular, one maxillary ...
Dr Elizabeth Himel’s path in dentistry is shaped by heritage and guided by a strong sense of purpose. From taking over her father’s private practice to ...
If there is one thing that dentistry has taught me, it is that the ability to read people will take a clinician further than any continuing education course...
As dental professionals, we have all had that gut-wrenching moment when a cancer patient walks through our door mid-treatment. Their mouths are full of ...
Live webinar
Fri. 13 February 2026
12:00 PM EST (New York)
Live webinar
Mon. 16 February 2026
12:00 PM EST (New York)
Live webinar
Tue. 17 February 2026
12:00 PM EST (New York)
Live webinar
Wed. 18 February 2026
9:00 AM EST (New York)
Dr. Anna Lella, Ms. Francesca Nava
Live webinar
Wed. 18 February 2026
12:00 PM EST (New York)
Prof. Dr. João Caramês CODE expert, Dr. Robert Gottlander DDS
Live webinar
Mon. 23 February 2026
3:00 AM EST (New York)
Ass. Prof. Elizabeth Shick, Dr. Zehra Yonel
Live webinar
Tue. 24 February 2026
1:00 PM EST (New York)
Prof. Dr. Markus B. Hürzeler


 Austria / Österreich
 Bosnia and Herzegovina / Босна и Херцеговина
 Bulgaria / България
 Croatia / Hrvatska
 Czech Republic & Slovakia / Česká republika & Slovensko
 France / France
 Germany / Deutschland
 Greece / ΕΛΛΑΔΑ
 Hungary / Hungary
 Italy / Italia
 Netherlands / Nederland
 Nordic / Nordic
 Poland / Polska
 Portugal / Portugal
 Romania & Moldova / România & Moldova
 Slovenia / Slovenija
 Serbia & Montenegro / Србија и Црна Гора
 Spain / España
 Switzerland / Schweiz
 Turkey / Türkiye
 UK & Ireland / UK & Ireland
 International / International
 Brazil / Brasil
 Canada / Canada
 Latin America / Latinoamérica
 China / 中国
 India / भारत गणराज्य
 Pakistan / Pākistān
 Vietnam / Việt Nam
 ASEAN / ASEAN
 Israel / מְדִינַת יִשְׂרָאֵל
 Algeria, Morocco & Tunisia / الجزائر والمغرب وتونس
 Middle East / Middle East













To post a reply please login or register