A hallmark of the most successful modern clinicians is the ability to strike a balance between a daily load of 12 to 16 patients and maintaining the same high standard of care. No easy task when it comes to implant cases. Currently, the manufacturer is responsible for the components, the laboratory for the restoration — after receiving the impressions.
Restoratively, that’s like erecting a house on an existing foundation, limiting the builder. Proper esthetics requires soft-tissue contouring that begins at implant placement, making stock components less than ideal.
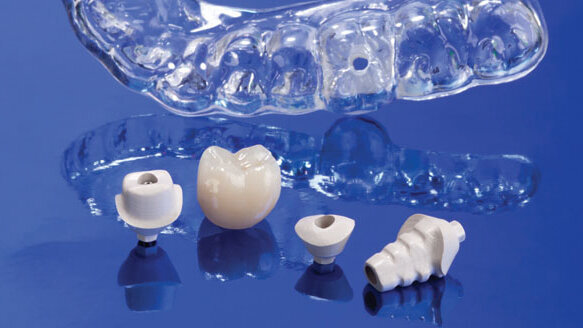
With the new Inclusive Tooth Replacement Solution from Glidewell Laboratories, custom-designed temporary components allow for immediate provisionalization specific to each patient, and a matching custom impression coping communicates the final gingival architecture to the laboratory. Add the implant, surgical drills, prosthetic guide, final custom abutment and final BruxZir Solid Zirconia restoration (Glidewell), and the clinician receives all the components necessary to place, provisionalize and restore the implant.
embedImagecenter("Imagecenter_1_540",540, "large");
The Inclusive Tooth Replacement Solution supports a streamlined workflow that ensures predictability and long-term success. Armed with the endgame in mind and the tools and road map to get there, experienced and novice clinicians alike can place and restore dental implants with greater confidence than ever before.
Implant treatment workflow
- Consultation and data collection
- Day of surgery protocol
- Healing phase
- Restorative phase: final impressions
- Delivery of final prosthesis
Consultation and data collection
For single-tooth replacement or full-mouth rehabilitation, comprehensive treatment planning is paramount. You’ll need:
- Full-arch upper/lower impressions (PVS)
- Bite registration
- Full-mouth radiographs (panoramic and CBCT scan, as needed. Note: If you do not have a CBCT scanner, refer patient to an imaging center.)
- Shade match of existing dentition
- Preoperative photos
- Once you’ve selected a diameter and length of implant, forward the diagnostic materials (impressions, models, bite registration, shade, implant size) to Glidewell for fabrication of the custom components. The laboratory will pour and articulate the models and assemble the components, delivered to you in an all-inclusive box (Fig. 1):
- Prosthetic guide (Fig. 2a)
- Custom temporary abutment (Fig.2a)
- BioTemps provisional crown (Glidewell) (Fig. 2a)
- Custom healing abutment (Fig.2a)
- Custom impression coping (Fig. 2a)
- Surgical drills (Fig.2)
- Inclusive Tapered Implant (Glidewell) (Fig.2)
Day of surgery protocol
Place the box contents alongside your usual surgical armamentarium. Confirm the prosthetic guide fits snugly around the teeth. Visually confirm the proposed location of the implant osteotomy correlates with your planned location.
After placing the implant, decide based on the level of primary stability whether to place the custom healing abutment or the custom temporary abutment and accompanying BioTemps crown. Either option will begin sculpting the soft-tissue architecture around the implant to develop the future emergence profile.
If there is adequate attached tissue, use a tissue punch to remove the soft tissue over the osteotomy site; otherwise, reflect a flap. Note that the margin of the custom temporary abutment is set at approximately 2 mm.
Depending on the thickness of the soft tissue, the abutment can be adjusted and BioTemps crown relined. The custom healing abutment or BioTemps crown must be 1 mm to 1.5 mm out of occlusion to avoid occlusal stress.
Store custom impression coping with patient chart for the restorative phase.
Healing phase
Schedule monthly follow-up appointments to ensure osseointegration is progressing and to adjust the provisional restoration.
Restorative phase: final impressions
Upon successful osseointegration, the restorative phase begins. Contours of the custom impression coping match those of the custom healing abutment or custom temporary abutment, so it’s simple to remove the custom abutment, seat the impression coping and take an accurate full-arch final impression using a closed-tray or open-tray.
Complete a simple prescription form included with the original box, select your final custom abutment and final shade for your BruxZir or IPS e.max® (Ivoclar Vivadent; Amherst, N.Y.) restoration, and simply forward these items to Glidewell. There are no additional laboratory fees.
Delivery of final prosthesis
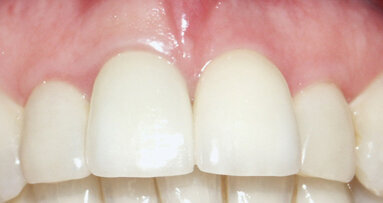
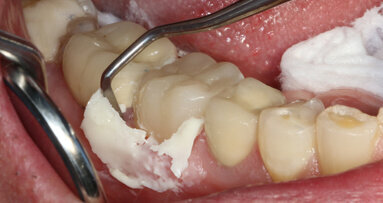
On the day of delivery, remove the custom temporary abutment and clean all debris from inside and around the implant. Try in the final Inclusive Custom Abutment (Glidewell) and BruxZir or IPS e.max crown (Fig. 3). Check the contours, contacts and occlusion and adjust as needed.
The final occlusion should be light on the implant-retained crown, with forces directed along the long axis to minimize lateral forces. The abutment screw is tightened to 35 Ncm, head of the abutment screw covered and crown cemented. All excess cement must be removed. Instruct your patient about home care, and set a recall schedule.
Note: This article appeared in Dental Tribune U.S., Daily in Chicago edition, Vol. 5, No. 3, Saturday, Feb. 25, 2012
With more than 40 years of clinical evidence, titanium endosseous implants have become an acceptable (evidence-based) form of treatment to replace natural ...
CHICAGO, Ill., USA: BISCO’s next-generation resin cement combines the benefits of bonding with the simplicity of a traditional cementing protocol.
CARLSBAD, Calif., USA: Zest Dental Solutions, manufacturer of the LOCATOR Family of Attachment Systems and a provider of clinician-trusted dental materials ...
The practice of dentistry requires us to have our eyes wide open to accurately assess vital structures and provide our patients with optimal outcomes. The ...
CHICAGO, Ill., USA: Fluoride provides health benefits throughout a person’s life, especially for bones and teeth, according to the Academy of ...
By far the most frequently asked question in every orthodontic office is, “When are my braces coming off?” In the fast-paced, busy lives of ...
NEW YORK CITY: In a perfect world, most dentists would probably want to provide cone-beam volumetric imaging (CBVI) to their patients. After all, the ...
As has been stated by Dr Harold M. Shavell, “Occlusion and morphology are the common denominators of all dentistry.”1 A single tooth or restoration can ...
CARLSBAD, CA, USA: In an interview, Dr Steven Beuligmann discusses his practice expansion project, including his search for a new location, the vision he ...
From June 23 to 26, Nobel Biocare held its global symposium in the world metropolis of New York in the US. The company staged a truly exceptional event with...
Live webinar
Tue. 24 February 2026
1:00 PM EST (New York)
Prof. Dr. Markus B. Hürzeler
Live webinar
Tue. 24 February 2026
3:00 PM EST (New York)
Prof. Dr. Marcel A. Wainwright DDS, PhD
Live webinar
Wed. 25 February 2026
11:00 AM EST (New York)
Prof. Dr. Daniel Edelhoff
Live webinar
Wed. 25 February 2026
1:00 PM EST (New York)
Live webinar
Wed. 25 February 2026
8:00 PM EST (New York)
Live webinar
Tue. 3 March 2026
11:00 AM EST (New York)
Dr. Omar Lugo Cirujano Maxilofacial
Live webinar
Tue. 3 March 2026
8:00 PM EST (New York)
Dr. Vasiliki Maseli DDS, MS, EdM


 Austria / Österreich
 Bosnia and Herzegovina / Босна и Херцеговина
 Bulgaria / България
 Croatia / Hrvatska
 Czech Republic & Slovakia / Česká republika & Slovensko
 France / France
 Germany / Deutschland
 Greece / ΕΛΛΑΔΑ
 Hungary / Hungary
 Italy / Italia
 Netherlands / Nederland
 Nordic / Nordic
 Poland / Polska
 Portugal / Portugal
 Romania & Moldova / România & Moldova
 Slovenia / Slovenija
 Serbia & Montenegro / Србија и Црна Гора
 Spain / España
 Switzerland / Schweiz
 Turkey / Türkiye
 UK & Ireland / UK & Ireland
 International / International
 Brazil / Brasil
 Canada / Canada
 Latin America / Latinoamérica
 China / 中国
 India / भारत गणराज्य
 Pakistan / Pākistān
 Vietnam / Việt Nam
 ASEAN / ASEAN
 Israel / מְדִינַת יִשְׂרָאֵל
 Algeria, Morocco & Tunisia / الجزائر والمغرب وتونس
 Middle East / Middle East











To post a reply please login or register